Pages

Showing posts with label patterned paper. Show all posts

May 29, 2014

May Recap: Recollections Kit was Outstanding!


This month's kit, Reflections by Echo Park, was awesome!  I was able to do quite a few layouts and even a couple cards, with lots of papers and embellishments left over for more!

Here are photos of my layouts that I completed this month:


 And cards too!


Don't forget that this month, kits are 30% off at The Memory Nest!  


AND . . . . 
In honor of Leslie's birthday (the owner of The Memory Nest)
here's another awesome deal that expires June 30, 2014:


A full recap and "Kill the Kit" narrative will be on my YouTube Channel this weekend!

Ready for more inspiration?  Check out the other design team members!


May 8, 2014

Throwback Thursday: Using Paper Loft paper


A couple years ago, I went to a CK Scrapbook Convention here in Texas.  At the time, I didn't own a lot of quality paper, so I loaded up on some muted, more masculine colors for layouts of my husband and boys from the Paper Loft booth.  Sadly, that paper has been untouched in my stash since that time!

Challenging myself with this Throwback Thursday series, I pulled out all the Paper Loft I owned to do some layouts.  I did not have any embellishments, but I did have some Paper Loft cut-aparts which I used.

For the embellishments, I went to my stash, using navy chipboard Basic Grey letters (from my last Throwback Thursday challenge), buttons and other miscellaneous pieces.

The Paper Loft papers came from these collections:  For the Record, Old Town Tavern, Back Country and Autumn Splendor.  Here is what I came up with!


This is probably the most layered and elaborate of the three layouts I completed.  You can see buttons and twine from my stash, canvas letters from Making Memories, bingo card from Teresa Collins and the chipboard pen from Basic Grey Fact & Fiction


This is my handsome hubby, incognito with his "mountain man" look.  The heart is from Glitz, "love meter" sticker from Crate Paper, navy chipboard letters from Basic Grey, buttons from my stash, and tickets from Making Memories.


I absolutely love my Hub's new boots, and he laughed when I took this photo.  However, with photo editing and these papers, I think the layout is as awesome as the boots!  Here I used some brads from my stash, another Teresa Collins bingo card and the Basic Grey chipboard letters, along with other miscellaneous embellishments from the stash.

No process videos for these layouts this time, but I will be posting a couple videos using a kit that is "New to Me" from The Memory Nest by this weekend! 


Jan 16, 2014

Scrapbook Process: RSVP by Basic Grey!

If you find yourself behind in your Birthday layouts or cards, Basic Grey has once again made a versatile kit that is perfect for both. It's the RSVP paper line, and this week I am highlighting this lovely kit, courtesy of  Leslie at The Memory Nest Store and the Blog.

 
Papers included, Side A

Love these B sides!

Here is how I started my layout:  The left of this next photo shows previous 8-1/2 x 11" pages that I wanted to redo in 12 x 12 size, along with the reprints of the focal photos that I want to use this time around.  

I chose this combination of paper for the page:


Oh, and check out January's Pagemaps at pagemaps.com; their sketches this month are SO fitting for this paper kit!  This is the one that I selected:


Here is the start of the layout process incorporating three photos instead of just the one as shown on the original sketch:    


Normally I don't utilize stamps for layouts, however, I had a Hero Arts stamp set with a cupcake motif that was perfect for this particular page! It was time to practice with my Bic Mark-Its (plus a Copic blender pen). I am not a alcohol marker pro whatsoever, so in this case I stamped the image three times so that I could practice color combinations and choose the one that worked best. 


The complete layout:  This page also includes items from the RSVP Mixed Brads, available separately from the paper kit (but a must-have!):


Here are some closeups of the embellishment areas. Aren't the pinwheels cute? Oh, and notice what I did with the title - I was out of "E's" so I substituted with "3's" turned backward.  It fits the whimsical feel of the layout, don't you think?


This is a closeup of the finished cupcake, colored in with Bic Mark-It markers.  The Copic blender pen was used to soften the lines of the two-toned chocolate frosting. As a special touch, the frosting was highlighted with a Sakura Stardust Gelly Roll Pen.


Have you had a chance to use this paper kit yet?  If so, leave your blog page link in the comments below so that we can see your creations!

Come back tomorrow for a special announcement and on Saturday to see a super simple birthday card that was created from the RSVP kit!  

Dec 5, 2013

Throwback Thursday: Generation Z from Little Yellow Bicycle

This week on Throwback Thursday, I'm highlighting two page layouts with paper and embellishments from Little Yellow Bicycle's "Generation Z" collection  While the sketch is similar for each, the difference in the papers and embellishments make them look totally different:


These layouts will be ready when I come across the perfects photos of my teenager!

What collection from the past can you use this week to finish a page layout??


Dec 3, 2013

Scrapbook Process: Don't Stop Believin' with My Minds Eye

Hi Everyone!  A quick post today to tell you that you must check out the December Reveal over at The Memory Nest blog today!  The Design Team is showing off new paper lines, and my designated collection is the new "Vintage Christmas" by My Mind's Eye!


This paper kit is so lovely; I immediately "killed the kit" and made a total of four layouts and three cards!

Along with this kit (which includes a fantastic sticker sheet) I added the Basic Grey Basics candy buttons in gold and silver glitter (which I will show on a future layout) from The Memory Nest store.  From my stash I used some poinsettia flowers, twine, buttons, brads and Thickers.  On the papers used for this layout, I distressed the paper edges with Vintage Photo Distress Ink by Ranger.  

Stop by The Memory Nest store and pick up the Vintage Christmas kit -- it's on SALE RIGHT NOW!

Come back on December 10th:  I will be back on The Memory Nest blog with another layout from this collection that will hopefully inspire you toward getting Christmas photos scrapped right away!


Nov 27, 2013

Scrapbook Process Video: You Look Dapper

Using the Dapper Dan collection by Glitz pushed my creativity this month, since it is a more masculine theme.

This scrapbook process video shows my process for single page layout using Dapper Dan without using a sketch.  I challenged myself to use more embellishments and stickers than I normally do, and also to find a couple items from my stash to add to the layout.


I think my son looks extra "dapper" on this page!

Look for another YouTube video soon that will share all my layouts (and a bonus card) that I was able to complete with the Dapper Dan kit from The Memory Nest.  If you like this collection, head over to The Memory Nest where the kit and matching washi tape are on sale for this month!

Nov 26, 2013

Scrapbook Process: Selfie Challenge

With homeschooling, birthday celebrations, and other Design Team challenges, I haven't had too much time lately to do any other challenges. However, I couldn't pass up the opportunity to participate the latest "Make It Monday" challenge at The Memory Nest.  This time, the challenge had a sketch and the theme of a "selfie."  I had the perfect photo from Halloween!


All items on this layout (paper and embellishments) are from American Crafts.  

The challenge is open through the rest of November, and if you participate, you will have the chance to win a gift certificate from The Memory Nest!  


Nov 21, 2013

Throwback Thursday: Yee-Haw with Creative Imaginations!

Lately, I seem to be in a "manic" scrapping mood.  This past week has been the Fall Clean-up of my scraproom (which is also our homeschool room).  I organized many of my patterned papers with matching embellishments (actually putting together kits) so that I would be able to sit down and really get some pages finished.  (Or as some scrappers say, "Kill the Kit!")

(A YouTube video of my craft space will be coming soon!)

Today I am highlighting a couple finished pages that fit in well with "Throwback Thursday".  Both of these layouts use an older collection from Creative Imaginations with a matching sticker sheet.  I found some chipboard and brads from my stash that went well with the "western" theme, in addition to some distressed looking flowers that I made.

This first one is a Halloween photo of my boys from 2006 (they were 9 and 4 years) with special photo effects to make it look a little more vintage.  


This is definitely one of my favorite photos, and this western themed paper was perfect (which is the reason that I purchased it long ago!) 

Next is a Throwback-Throwback Thursday layout!  The photo is actually me in the early 80s, when the western style was so popular!


Because the photo was so small, I kept the area tight with the embellishments and layers so that the photo would stand out. Distressed inks were used on the chipboard butterflies and buckle.  This was the first time I have completed a layout with just one, very small photo and although it was a challenge, I am very pleased at how it turned out.  

(Check out YouTube later this month for a "Layout Share" of some of my favorite "Throwback Thursday" layouts!

There will be another "Throwback Thursday" on December 5th, with something from Little Yellow Bicycle.  Thanks for visiting!  See you next time!

Nov 12, 2013

Scrapbook Process: Soccer Layout with Dapper Dan

For the month of November, my design team challenge for The Memory Nest was to use the new "Dapper Dan" collection from Glitz.  This collection, available from The Memory Nest store, came with 12 patterned papers (two of each style), accent sticker sheet and alpha sticker sheet.  There is also arrowed Washi tape available separately, which I highly recommend (it's versatile enough to use for many other pages!).  Both the paper kit and the Washi are on sale this month at The Memory Nest!

Glitz is unique when it comes to their paper collections - they take current trends and put their own individual twist on them - they often look very different than the other paper debuts during the same season.  It's the same case for their "Dapper Dan" collection.  Glitz grabbed a hold of the mustache trend and added bold geometric patterns and woodgrains for a fun, masculine theme.

The challenge to myself was to take this collection and add my own twist -- to use it for pages that aren't dictated by the paper patterns itself.  For instance, I thought the colors really lended itself well for a soccer-themed, two-page layout:


For these pages, I used a few of my own miscellaneous sport embellishments from my stash (top of the second page).  The "Just Be Cool" card is from "Dapper Dan" that I had already purchased locally. 

Please hop over to visit my YouTube page here for the "Dapper Dan" kit reveal, plus process videos of this month's projects!

Throughout this month I will be posting two additional layouts plus a card made with the kit. The final layout will be completed after this month -- I will be doing a special page dedicated to my hubby's mustache that he is currently growing for the Movember  prostate cancer awareness month!

Thanks for visiting! 

Oct 10, 2013

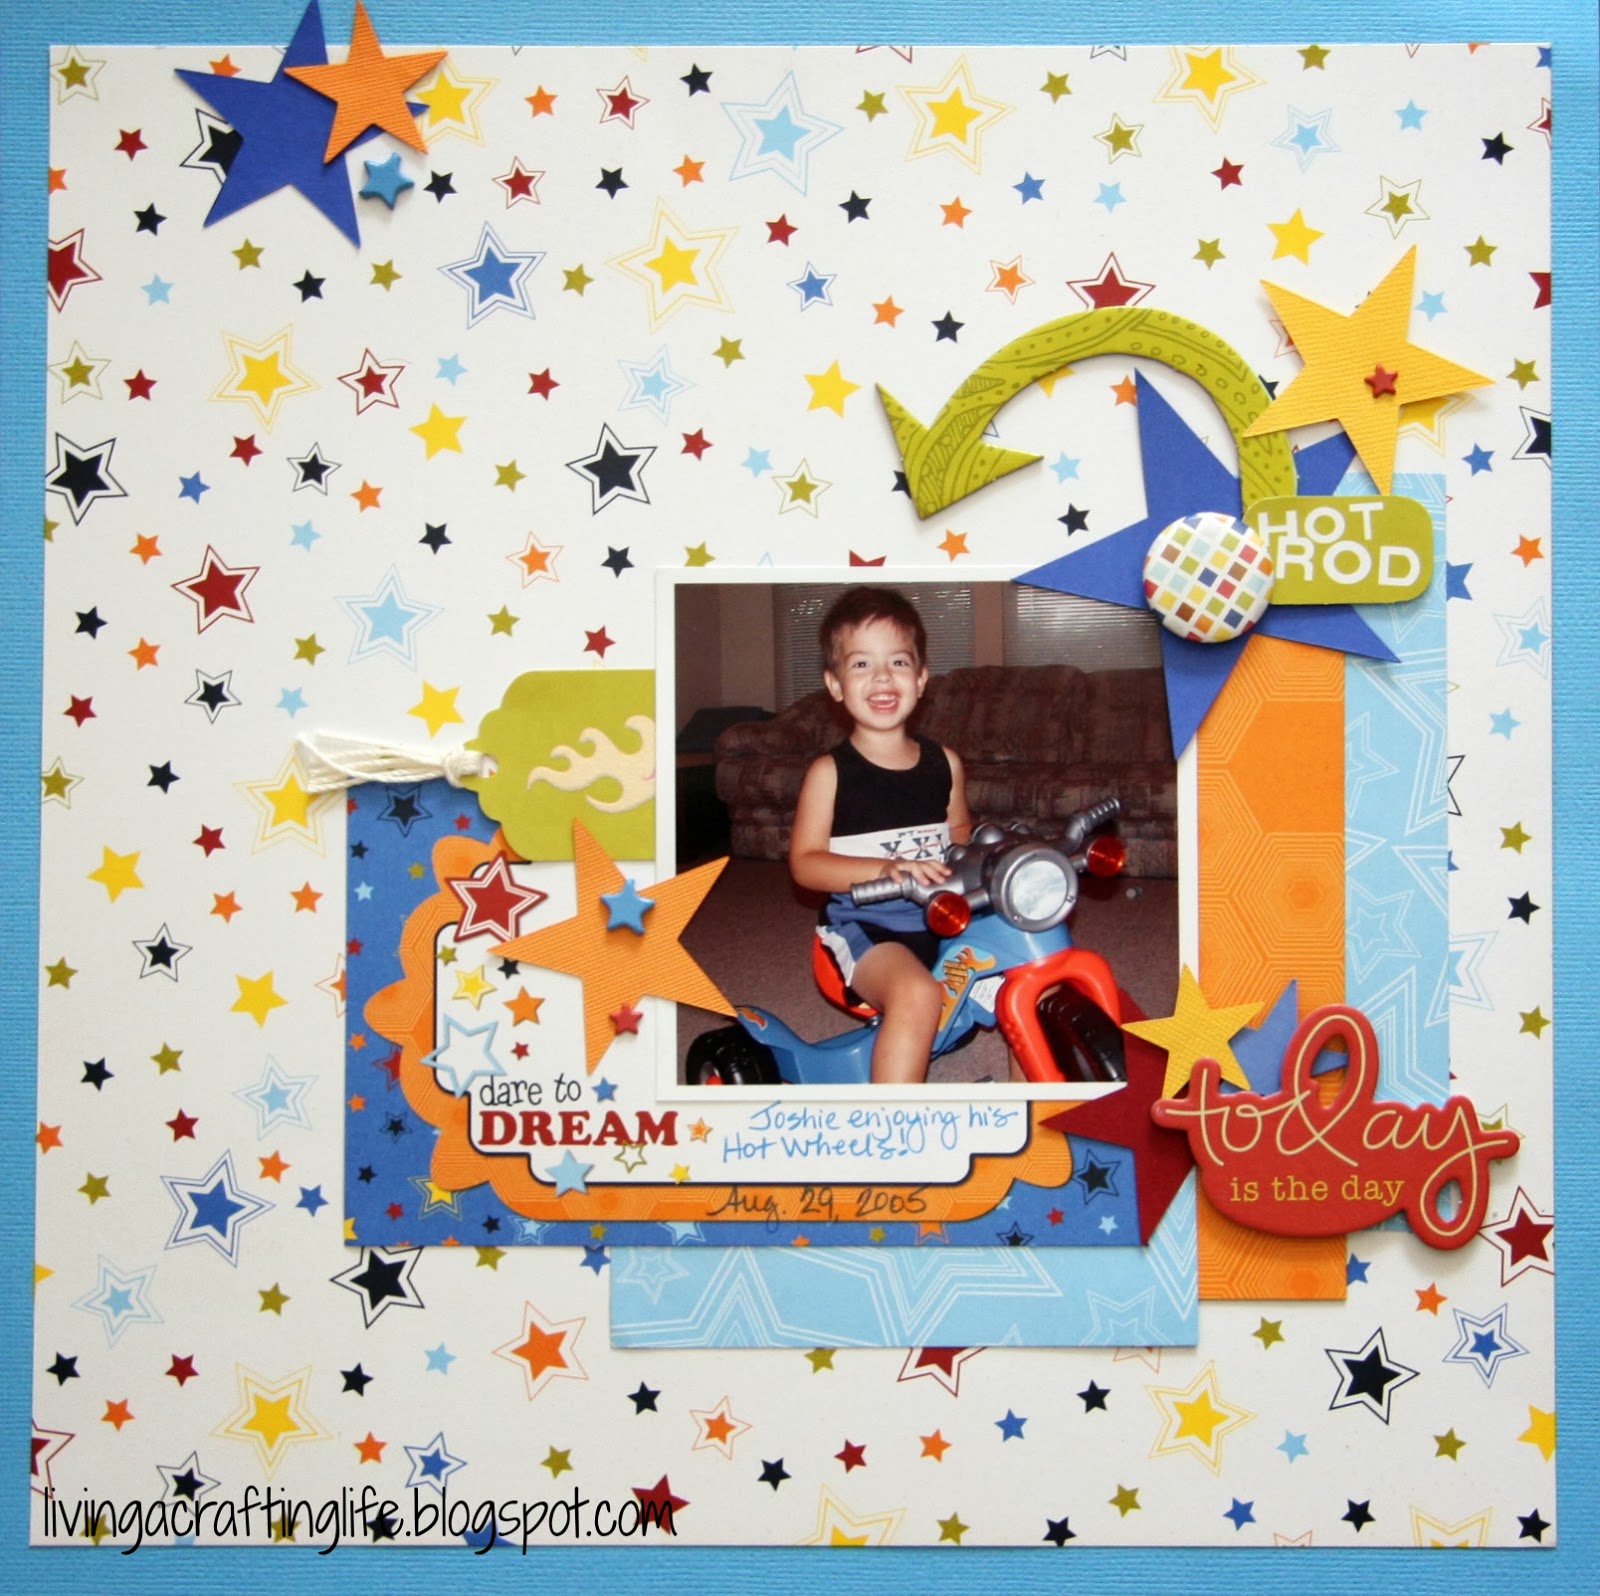
Throwback Thursday: Another "Blast Off" with Bo Bunny!

Last month, I posted a two-part video series, which demonstrated how I designed two differently themed layouts from the Bo Bunny "Blast Off" collection kit.

After completing that project, I still had left over paper and die-cuts, so I was able to finish another page, with another twist:


This was a single, random photo I found of my youngest when he got his first Hot Wheels. (This bike made all the cool motorcycle sounds to go with it too!) The colors, stars and the "Dare to Dream" card seemed to be a perfect fit for this photo.  I printed the photo as a square with a white frame, which was reminiscent to photos from the late 60s, (except black and white) which was when I was Joshua's age and riding my first tricycle.  

What is your Throwback Thursday photo or layout this week?  

Oct 4, 2013

Scrapbook Process: More from "Feels Like Home"

Happy Friday!  Leslie from The Memory Nest revealed some great design team creations yesterday on her blog using some of the newest collections that you can find at her store.  You can see two more examples of layouts using the new "Feels Like Home" collection from Little Yellow Bicycle from Kelli (Use It Scrapbooking) and myself.

Now is a good time to check out the store -- Leslie has a great Croptober deal at The Memory Nest store!


For more details on the papers, stickers and chipboard pieces that I use from this collection and a look at the page layout process, you can check out my newest YouTube video:


This is the sketch from Pagemaps that I used for this layout:


Tomorrow is National Cardmaking Day!  Are you going to spend some time making cards?  If you want more inspiration, stop back here tomorrow when I will share FIVE sweet and homey cards that I made with this same Little Yellow Bicycle Collection!  

Oct 1, 2013

Scrapbook Process: Austin is Home with Little Yellow Bicycle

The new fall collection,"Feels Like Home" from Little Yellow Bicycle, is such a wonderful color scheme and so versatile. This collection is one of the new lines that is now available at The Memory Nest store!  Using this color combination made these fall family photos (taken in October in Texas) really seem homey and cozy (even though we were still in shorts and t-shirts!).


To complete this page layout, I "sorta-kinda" went by this sketch by Becky Fleck, from the August Pagemaps:  


Maybe you can tell that I turned AND flipped the sketch for my page . . plus added banners! With the LYB matching chipboard shapes and cardstock stickers, it made this page come together quickly. (There are also wood shapes available that are really fabulous!)

Here is a closer look at one of my embellishment clusters.  Pop dots were used for the chipboard and flower stickers for dimension, plus enamel dots were added from the Family Stories collection by Teresa Collins, also available at The Memory Nest store!


Now is the time to check out this collection and other new additions at The Memory Nest store where you will get fast and friendly service!

Sep 21, 2013

Scrapbooking Process: More Nautical Fun with "Down By the Shore!"

It has been so much fun using the new "Down by the Shore" collection by Fancy Pants that is available at The Memory Nest store!  This week I finished three more layouts, two of which I will share here.  I used the paper, stickers and punch-out diecut banners from the collection, and added other embellishments from my own stash.


This is definitely a summery layout -- with all that golden sun!  I used left over borders from the previous layouts to add a contrasting topper to the page, along with some other scrap strips to anchor my photos.  I added the sun paperclip, button, brad, washi and rhinestones from my stash to dress it up.  The Thickers in the bold, bright blue should express the fact that I was so glad to be back on my hometown beach!


For this layout, I used the rest of the banners from the diecut sheet, strips of paper unused from other layouts, adding my buttons and brads, natural color crochet twine and vellum quote. Under the quote is another small photo of the same location. The layout is 11-1/2" square, matted on white cardstock.  

Again, two completely different summer layouts; one collection!

Order the "Down By the Shore" collection now from The Memory Nest so you can scrap those wonderful summer photos! AND -- save 20% by using the special code SEPTNEW20 before the end of this month!  The Memory Nest is the best place to get your scrapbooking supplies.  Great customer service, fast shipping and excellent prices.

Find more inspiration on this collection and all the other new paper lines at The Memory Nest blog.